The Correct Joystick Configuration of Your MuVIT System
For this tutorial blog about joystick configuration, we will presume that you have all the essential parts of a MuVIT system ready to go. It could be useful to print the second half of this tutorial as there are cases where Virtual Sailor loses its configurarion and you need to reenter it. With this tutorial in hand it should only take a few seconds if necessary.
This will focus primarily on setting up the wheel and throttles which can be a little confusing if you’ve never had to muddle your way through the Windows joystick interface or as they call it “Set up USB game pad controllers” We’ll start with the joystick controller setup so you can learn some fundamentals or you can jump ahead to the Virtual Sailor specific setup. The information contained herein is specific to the MuVIT configuration but can be applied to any joystick or button pad quite readily.
Joystick aka Gamepad configuration
First, it helps to understand that most joysticks are really essentially gimbaled or rotating potentiometers. In MuVIT’s case, the throttles are of the rotating variety that changes value as they turn, this is then interpreted by a controller in the throttle housing which sends that data to the computer. that’s all you need to know to use the joystick configuration tool. Using this tool you can confirm if the wheel and throttles are operating even if they are not fully configured.
You start the joystick/gamepad tool by typing “joystick” (without the quotes) into the search box on the Windows task bar.

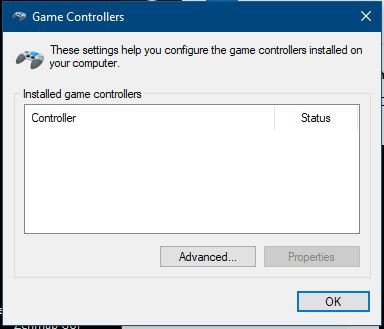
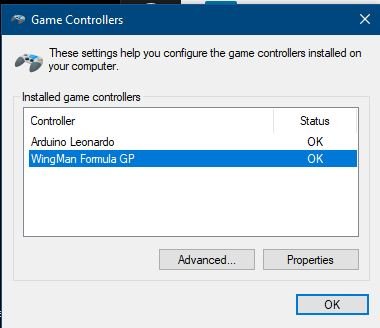
Click on Set up USB game controllers. That will bring up a screen like one of those shown below. The one on the left shows no USB devices connected and on the right what you could expect to see with both the wheel and throttle connected. Depending on what actual devices you are using the names may vary. If you have devices plugged into the USB and one or more aren’t showing, you need to resolve that issue, which is outside the scope of this post. Often it can be as simple as a reboot to get the drivers loaded properly.


Working with the right-hand display above which shows both devices you would select one by clicking which highlights it as shown, then clicking on properties. In this case, we’ll start with the wheel which is the WingMan Formula GP.

The joystick configuration and test screen shows some important information about the device. In this case, it shows that the wheel has 6 buttons. If you push a button on the wheel the corresponding red dot on this display will light up to show it is working. This is can be helpful if you have reason to think one or more buttons are not working properly.
Above the buttons is the Axis display which is used to show the position and movement of the device in the X and Y Axis. Moving the wheel will cause the + symbol to move right and left in the display along the X-axis. Make a note of this, you will use this information later when you have to assign the Axis to functions.
Side note – you may notice that the + is off-center above, this is because the wheel was not centered when the machine was booted and as a consequence, it calibrated 0 as slightly left, this will result in a bias in the steering to the left. Always make sure the wheel is centered when booting or power it so it can auto-calibrate during boot. Some like the tight powered wheel, and some like the loose unpowered wheel. Some wheels require power to work some don’t. The Wingman doesn’t require power but can be powered to allow auto-calibration, so pick your options.

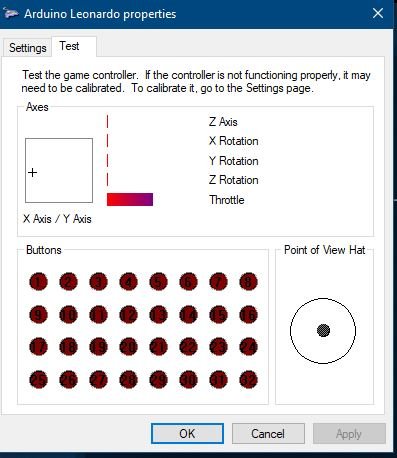
The wheel was pretty basic but the MuVIT dual throttle looks much more complex, it really isn’t. Most of what is shown here is unused at this time so they don’t matter, like all those buttons. At this point, there aren’t any buttons so you can ignore those.
Assuming you had the throttles centered when you booted the computer it should look like what is shown above. As you move the two throttles you will see the Throttle bar move to the right and left and the + in the axis display moves up and down in the Y axis. Make note of which throttle moves which. This will matter in the next section. And that concludes the Windows joystick configuration section, you now should know how to use and understand the basics of the joysticks and what the different parts are.
Virtual Sailor joystick configuration
The joystick configuration for Virtual Sailor NG is pretty straightforward and if you jumped ahead to this section you should be able to set it up without any problem. If you have problems back up and use the information above to help troubleshoot.
When you start Virtual Sailor, on the splash screen (start-up page) click on the settings button (left below) and then the Joystick tab (right below) click the images to enlarge.
Presuming you have your wheel and throttles connected you will have a screen as shown below for the final joystick configuration.
For the wheel, select the wheel under Connected Devices and you want to set the X Axis to Ailerons. Yes, the is a rudder selection but it won’t do what you want it to, the person who wrote the program used to do flight simulators and hasn’t changed the label of the component so there you have it, use ailerons for the wheel. Don’t check reverse unless for some unlikely reason right and left are reversed. You can test the operation by turning the wheel and watching the aileron bar in the top right move back and forth.
The throttles are much the same, although you sometimes have to switch the right and left engine, you can tell by testing and seeing that the correct engine is moving in the top right display. Adjust accordingly but the basic axis and slider will remain the same, just switch the engines if necessary. You shouldn’t have to reverse these either but if the situation arises, you can check the reverse box to correct the throttle forward/reverse behavior. You can also adjust the dead zone if you wish by enabling it in the checkbox and using the slider to adjust. That allows a certain amount of movement in the controls before any action.
Once you get that dialed in which should only take a couple minutes, click on the save button in the top left of the menu. I usually save twice, once as defaults which is what comes up when you click save and then I save again as MuVIT or whatever you choose. The reason is that there are cases where during upgrades the default settings get overwritten and if you saved an alternate copy you can just load that. But I’d keep a hard copy of the configs shown here with the system as it does occasionally seem to lose the configuration and you can get it back in just a minute if you keep that handy.


