How to configure the MuVIT network
To get the maximum benefit and capabilities from MuVIT you need to configure it to make use of what we will call the MuVIT network. This network allows the tablet to function to help control the simulator, the interface with OpenCPN and provides the potential for multiple users to join into a simulation and interact with each other.
Configuring the MuVIT network isn’t overly complex or gut-wrenching but it does take a little planning to get the best results. First, you need to decide what your topology will be. Specifically, do you plan to use just the MuVIT platform or include OpenCPN? Will you have multiple users operating together in a simulation environment and how many? For the sake of this post we won’t be delving into how to add additional users into a simulation, we’ll save that for another day.
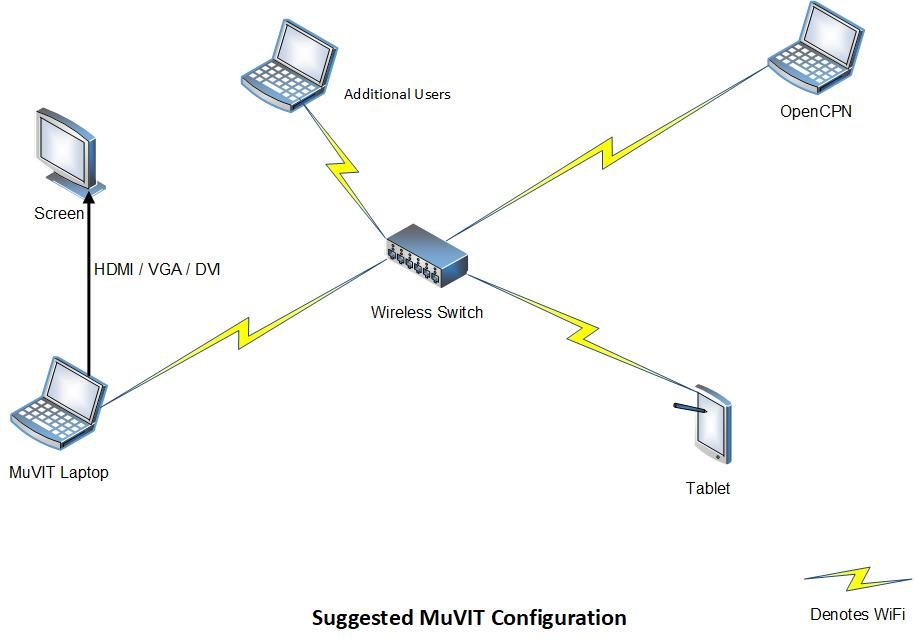
So, lets start with a basic diagram of the MuVIT network and go from there.

You’ll note that I suggest WiFi as the MuVIT network medium but you can use a wired network if you prefer. In the case of a wired network, you would simply plug the network connectors into the switches network connectors for the same results. We will be describing setting up a wireless configuration for the sake of this post but the activity is much the same.
First, you have to configure the wireless router for everything to connect to, if you already have one setup you are halfway there. If you need to build one, you’ll need to consult your owner’s manual because every manufacturer has their own process. If you bought it from our online store it will be configured for you with documentation for use. If you are doing it yourself I’d suggest getting an at least an 802.11g router but an 802.11n or ac is better. Be sure to turn on at least basic WPA and put a password on the router to keep people out of the laptop and the network.
Of course, if you are operating in a venue such as your clubhouse or some such which has a wireless network installed, just connect to that and skip all the access point configuration issues. How well this will work in a general public WiFi network, I have no idea, that all depends on how it was set up and what it will allow, but I wouldn’t do this at Starbucks anyway!
The tablet should connect to the Unified Remote server on the laptop assuming you have everything configured correctly and you can then select the MuVIT menu which should appear on the tablet. If you have problems and are sure you have it configured correctly check this post for help. If you bought it from our store you can always open a ticket and we’ll be happy to help you out.
Now, assuming you have Virtual Sailor up and wish to use it with OpenCPN this if where some configuring comes into play.

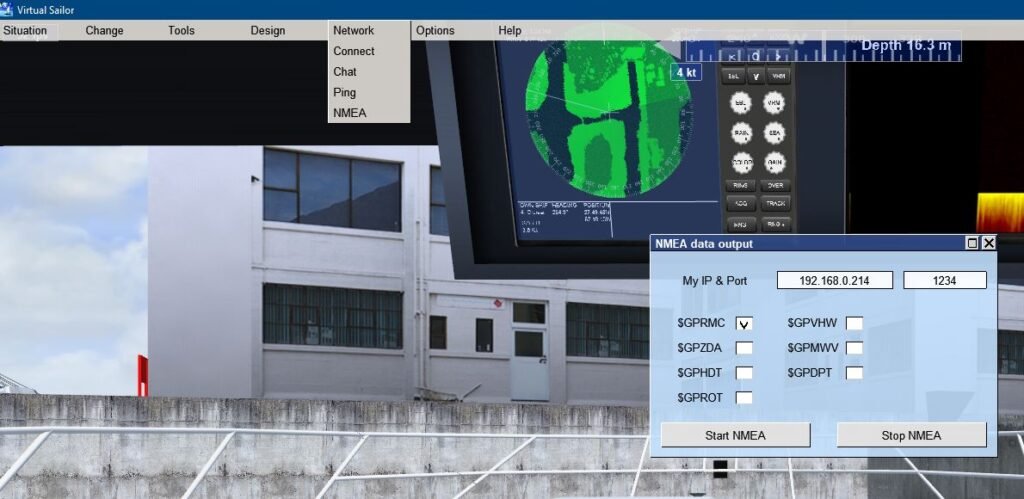
You will need to setup the NMEA settings in order to get Virtual Sailor to work with OpenCPN. This isn’t difficult but you will need to make some notes. First go to the toolbar at the top of the screen and select Network, Then select NMEA, you should get a screen similar to that shown above.
The checkboxes don’t matter much, you can look them up to see what they would output but we are mainly interested in the first check box $GPRMC which is the NMEA sentence that contains all the basic GPS navigation information. Along with this, you will want the ip address and port number to enter into OpenCPN.
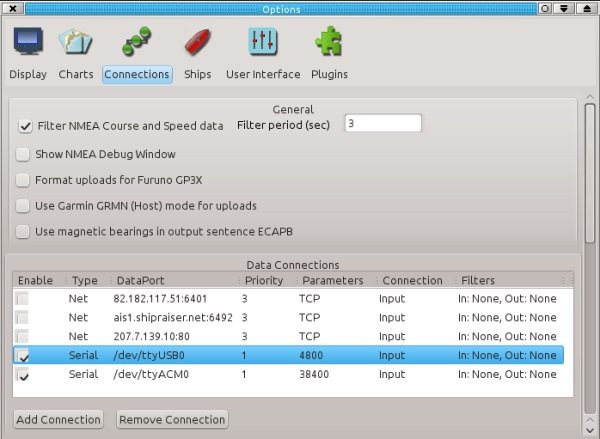
Now go to OpenCPN and select Connections from the top of the menu. You will get a window similar to that shown below. Very likely the connections list will be blank since there is nothing connected. Select Add Connection at the bottom of the window.

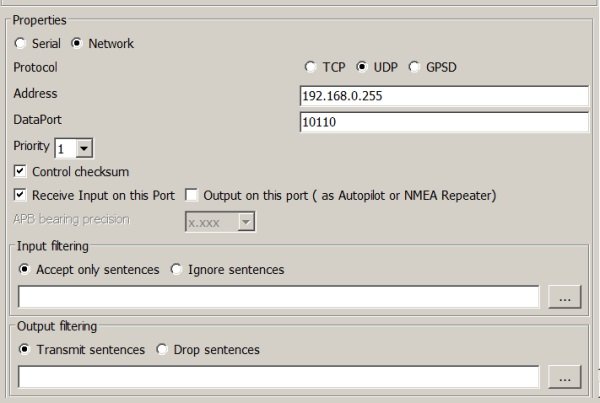
You should now have a window similar to the one below. Here you will enter the ip address and port number you hopefully wrote down earlier when you had the Virtual Sailor network NMEA window open. The numbers shown in these pictures are just examples, you need to replace them with the actual numbers you gathered earlier.
Once complete and you check Apply then OK, OpenCPN should be ready.

Now go back to the Virtual Sailor screen and click on the Start NMEA button. If everything is set up properly your boat should show up on OpenCPN in the location of your current scenery. Bear in mind that the accuracy of the plot on OpenCPN is a function of the individual who developed the scenery. Some are very accurate, some not so much. YMMV.
At this point you should have you basic MuVIT network up and running and ready to operate.
A potential problem you could encounter with the MuVIT network and the solution
I’ll take an aside here for a moment to talk about the tablet. While it can talk Bluetooth to the laptop I generally recommend you use the WiFi setting, particularly if you are operating in a public venue. This has less to do with security and more to do with interference. It has been my experience that a tablet’s Bluetooth can cause problems with the mouse if they are in close proximity, not every time but often enough to be problematic. I believe the tablet’s signal is drowning out the mouse and causing it to lose sync. The symptom most often seen is that when you start and are at the helm you will begin to drift backward. Sometimes rebooting helps but as often as not it doesn’t. If you are connecting the tablet via WiFi this problem seems to go away. Also, a wired mouse won’t have this issue but that consumes a USB port which are in short supply on laptops these days. Another problem with Bluetooth is pretty common in public venues where everyone has their phone, tablet, mouse, etc. The signals can interfere with each other. It is for these reasons I recommend using WiFi for the tablet connection.
As always, comments are always welcome.

